I wrote this tutorial on Aug 25, 2012 . Any similarity to any other tutorials is a coincidence.
I wrote this tutorial with the beginning PSP'r in mind.. with details and lots of screen shots.
Plugins that you will need for this tutorial:
Scrapkit used is a PTU kit from Toxic Desirez 'Kitty Kandy'
Art Graphics is from Nevilk Rocoo Wagner.. FTU artist
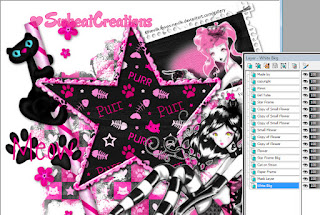
You can click on the above tag.. to see it better... the finished tag will be 900 x 900 I just re sized it so it would fit on the blog page.
1. Open the star frame that comes in the Kitty Kandy scrapkit..
BTW: you can use any scrapkit you want to.. just need a frame, you can always make your own star frame using a preset shape and fill it with one of the bkg papers.
Shift + D to duplicate the window and close the original frame. Good habit to get into. Re-size the frame 80% , make sure its UNCHECKED where it says re size all layers.
Go to Image/Canvas Size and type in 900 x 900 you can always re size later. Minimize this Star Frame image
2. Open the paper frame that's in the kit. its too long for what we need. So we're going to edit it. Duplicate, close out the original paper frame. We are NOW working on the paper frame window.
If they aren't already turned on.. go turn on your ruler guides that's under VIEW. Pull out your working image window so that you see beyond the side of the graphic, make a selection from 200 to 400 that's about in the center.. don't have to be precise.
3. Click delete button or 'cut' to delete that part out of the frame, deselect.
4. Make a selection over the left part of the frame/ copy/ paste as a new layer .While it's still selected make sure you on the frame layer and do Cut again..the two halves will be on their own layers.
5. Now move the left side of the frame over to the right and match up the two parts to make one frame.. merge/merge down.You could of used the deform tool BUT it would of changed the frame in a way you don't want.
6. Use your Magic Wand tool now and click on the inside of the frame to select it. Selections/ Modify/Expand 7 pix.
7. Pick one of the SOLID bkg papers that come in the scrapkit, these are tagger sized bkgs.. if your working with a full sized kit you will have to resize it to 19% or so...You can also fill with a coordinating color. You image should still have a selection on it.. With the bkg paper window active..drag the bkg paper layer from the layer palette over to your working image. It should look like below. Selection/ invert and making sure your on the bkg paper layer is selected.. click delete or cut.. This will have the frame with a bkg behind just the center of the frame.
7. Use your selection tool on ellipse, feather set on 30. Start in the center and pull out the oval selection.. make sure the selection does NOT touch the edges of the frame.. like below. Have to do it smaller than you think cause its feather is on 30 and it expands out further than you think.
8. Add a new raster layer, and fill the selection with one of the colors you're coordinating with.
9. I applied a texture using Filters Unlimited 2 or Texturizer this is an option
10. Merge all the paper frames layers and drag its merged layer from layer palette to your working image that you minimized a while ago.
11. Image/rotate/free rotate, using the settings below
12. You can now copy and paste the girl tube onto your working image.
13. Drag (or copy and paste) one of the bkg papers you like from the kit to the working image.
( BTW: moving one image to another image you simply drag its layer from the layer palette over to your working image window, another way is to copy/paste as a new layer)
On working image, drag that paper layer to the bottom on the layer palette..where its BEHIND (or under) all the layers, go to Layers/load/save mask/ Load mask from disk..and apply a mask on it. I used WSL_Mask225 she has some wonderful masks.. you can find them HERE
14. After you apply the mask, look on the layer palette it shows like 3 layers to the mask... right click on the top layer and merge/group. This is always done after applying a mask.
15. Use your magic wand selection tool and making sure your on the STAR FRAME layer click in side of it. It will have the marching ants around the inside..Go to selections/modify/expand 3 pixels. Choose another paper, drag it over to the working image under the frame layer, and go to selections INVERT now making sure you are on the new bkg paper layer hit delete or cut. it should just leave the paper on the inside of the frame. Remember your UNDO if its not..and may I say THANK GOODNESS for UNDO!!!
Your working image/ tag should look like below.. you can arrange things as you like.. it doesn't have to look like mine.
16. Its a good habit to get into, to name your layers as to what they are.
17. You need to duplicate the Star frame. Oh I forgot the above picture only shows 3 duplicates of the STAR FRAME... I ended up duplicating one more time..
So you end up with ONE original STAR FRAME and 3 duplicated star frames.. so 3 altogether..
18. Now time for the confusing part :) Hide or X out your original STAR FRAME by clicking the eye beside it's layer. Also hide 2 of the other STAR FRAMES... doesn't matter if you start from the top or bottom. Lets say you start from the top.. have it highlighted on the layers palette.. go to Effects/Alien Skin/ Xenofex 2/ Constellation. Put the settings as it shows below. Make sure its set on the transparent. Click OK then hide its layer you just applied that too and go to the next 'copy of Star Frame layer' back to Xenofex 2 all you have to do is hit the Random Seed button.. don't change any of the settings. Click OK hide that layer..get on the next STAR FRAME Layer back to Xenofex 2 and hit the Random Seed button again. All 3 of the duplicate layers of the Star Frame should have the Xenofex 2 applied to them.
19. NOW you apply an Effect/ 3D effects/ drop shadow on the original STAR FRAME as below.
20. Now I merged some layers.. so that this wouldn't be so confusing.. all the layers ABOVE the STAR FRAME Layers I merged , all the layers BELOW the original STAR FRAME layer I merged.. you don't have to.. but it leaves less on the layers palette to get confused about. As you can see below
21. Open your Animation Shop
22. Now you hide 3 of the STAR FRAME duplicate layers.(have one showing of the duplicates)
You always have the top and bottom merged layers UN HID also the original STAR FRAME UN HID. Look at the above picture if its confusing.. RIGHT CLICK on the top of your working image and COPY MERGE... go to your Animation Shop and right click on its desktop.. paste as a new animation.
23. Back to PSP and hide the one frame duplicate you had showing and UN hide the next one either up or down which ever direction your going. Right click on the top of the working image COPY MERGE back to AS right click on the frame window that's there and Paste / after current frame. Back to PSP hide that duplicated Star Frame and UN hide the next one, Right click on top and COPY MERGE, back to AS and Paste/ after current frame.. Back to PSP and same process.. Hide and Un hide the correct layers.. back to AS paste /after current frame.
24. You SHOULD end up with 4 frames to your new animation... check to see if it looks right by clicking on the button on the top (next to last button on the tool bar.. run your mouse over them will tell what they are, it says View Animation) if all looks alright.. then Save as a .GIF.
Hope you had fun.. see you in the next tutorial
TOODLES
Norma


No comments:
Post a Comment