

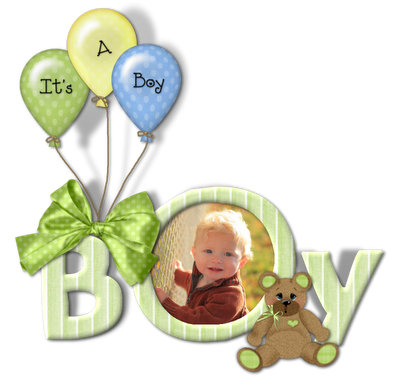
In this tutorial I created the graphic in a .PNG format then put it on this blog's bkg.. so it would blend in.You can put it on another bkg paper or on white whichever you would like.
I used one of my freebies for this tutorial you can find it
The full sized PTU kit is HERE
1. I started out with a fairly large new image.. but can resize later. 900 x 900 transparent canvas.
2. Take the bkg paper your going to use for the word BOY. If its a 3600 x 3600 sized paper, resize to 30%. Copy and paste it onto the new canvas or drag over.Duplicated the paper layer once so that you have 2 layers of it.. Use one of your FAT fonts, I used 'Elephants in Cherry Trees' for mine set on Size 150 3. Type out B and Y, leave out the O also put 2 spaces between..might just be one space for your font... you want to leave room for a bigger O is why we do this..I have my text tool set on vector in
PSP 9 just in case you need to shape the font fatter etc.

You can click on all my captures to see it original size.. so you can see it better :)
4. On your layer palette right click on the vector layer (font) and
convert to raster. You know I taught PSP for years in a yahoo group..and always told my students there are at least 3 different ways of doing the same thing in PSP. This is just MY way :) if you have a faster, easier way great.. do it..hey and let me know.. I sure can learn it too!!
5. Select All/ Float the letters, Invert and Cut (make sure your on the paper layer. If you're working on a Bkg layer.. you must convert to layer first before you can affect that layer.) You should have the letters cut out of the background paper. 6. Delete the text layer.Select none/ apply an inner bevel with these settings.. or play with the settings for your own 'look' :)
 7. Type your O for the frame of the child in the middle..using the font I did.. the inside of the O was not big enough so I typed it out and selected the center of it and expanded the selection and cut..it just depends on the font you're using.
 8. Cut out the text (mine in black)
 9. Then select the new O Select/Invert/ Cut making sure your on the paper layer.
10. Apply the same inner bevel on the O as you did with the
B & Y.
11. Copy & paste the photo of the child you're going to use, and drag it to the bottom layer. Resize the photo if you need to.
12. Select the center of the O with the magic wand tool. After its selected go to Selections/Modify/Expand 5 pixels.
Invert selection and Cut making sure your on the photo layer.
Unselect.
13. Apply all your drop shadows. Don't forget the drop shadow on all the elements that you add...Save as a .png file. Poof.. you're done!!
5. Select All/ Float the letters, Invert and Cut (make sure your on the paper layer. If you're working on a Bkg layer.. you must convert to layer first before you can affect that layer.) You should have the letters cut out of the background paper. 6. Delete the text layer.Select none/ apply an inner bevel with these settings.. or play with the settings for your own 'look' :)


10. Apply the same inner bevel on the O as you did with the
B & Y.
11. Copy & paste the photo of the child you're going to use, and drag it to the bottom layer. Resize the photo if you need to.
12. Select the center of the O with the magic wand tool. After its selected go to Selections/Modify/Expand 5 pixels.
Invert selection and Cut making sure your on the photo layer.
Unselect.
13. Apply all your drop shadows. Don't forget the drop shadow on all the elements that you add...Save as a .png file. Poof.. you're done!!
BTW I used Eyecandy 5 Impact/Perspective Shadow


