

The Tag is animated.. click on it to see it as it should be..
I just finished this tag so I thought I would write a tutorial also. I am using my scrapkit 'Rock it ' its a PTU kit you can purchase HERE
The tube's artist is Very Many you can purchase her art from here.
I'm assuming you know some about PSP.
You place your elements how you want... as I did above.
For the back of the tag I used the 'grunge back' that is in the Rock it kit. It looks like a mask was applied but it wasn't :) You start by putting down each layer..working from back (bottom) to front (top)
All the elements I applied a 3d drop shadow..then merged all but the grunge bkg and the bust of the tube thats in the frame.
The girl tube thats in the frame and the grunge bkg are merged together... you can add a white bkg under the grunge bkg if you want now and merge the 3 layers. Click on the captures below to see them full size.

I used selection tool to make a selection around the frame area...I unhid the frame..but when you apply the Eye Candy 5/ Textures/ Texture Noise.. you only apply it to the frame girl and bkgs merged.

When you have merged the bkgs and the girl tube thats in the frame area... you duplicate its layer 2 times.. so you will have 3 layers of the merged.

on the first of the merged bkg layers apply Eye Candy 5/ Textures/Texture Noise, using these settings:

Click ok and go back to the tag and select the next merged bkg layer and apply the textured noise again this time hit the RANDOM SEED button on the plugin..
Do the same with the last merged bkg layer.. go to EC 5 Texture/Texture noise and hit the RANDOM SEED again.
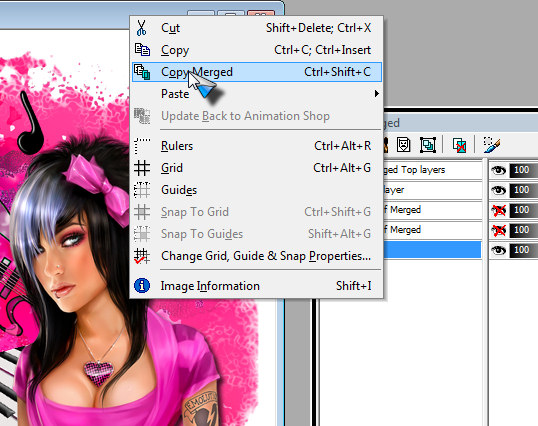
Open your animation shop now... on the layer palette you hide 2 of the merged background layers only have one un X'd everything else should be visible. Right click on the top of the image and click 'copy merged' Go to animation shop and right click on its desktop and paste as a new animation

Back to PSP then hid the merged layer you had visible and unhid another merge bkg layer.
You should have only one merged bkg layer showing at a time. go back to Animation shop and right click on your new animation and Paste behind currant frame.
Do the same with the next merge layer.. unhide it and hide the other one... Copy Merge then back to Animation and right click and paste behind currant frame... you should end up with 3 frames in animation shop. In animation shop go to edit/select all and right click on top of animation and go to animation properties and change from 10 to 25. Check your animation using the button
